Search This Blog

Friday, December 30, 2011

Embroidery Floss Bracelet

I saw someone come into my *real* job the other day and was wearing a cute bracelet. I asked her where she got it and she said she made it. She got the idea from pinterest. I took a look at it & knew I could make it too!
You'll need:
Embroidery floss
Charm that has open middle and is closed in some way (when you see it, it'll make more sense)

Cut 2 18in lengths of the embroidery floss & fold each in half. Pull folded end through the charm.

Loop the loose end through the folded end:

Repeat on the other side. This is where the lady's bracelet ended, but I wanted to take it a little bit further.
I took 2 silver beads & threaded one through each piece of floss & tied a knot.
I then tied a knot towards the end of each piece of floss, put on a bead & then tied anther knot.
Here's my finished product:
I love it! I'm by no means a jewelry maker, but this was so easy & I love the look of it! Trust me, if I can do it, anyone can!!

Wednesday, December 28, 2011

Name in a Frame

I recently had a friend who had a baby (super cute & cuddly by the way). I decided to give as my baby shower gift this:
I have something similar in my living room with our last name:
I don't remember where I initially got this idea, but everyone who comes into my home loves them!
All you need is frames, glue & letters. Remove everything from the frame and keep only the glass.
Glue the glass to the frame. Let glue dry according to directions.

This is the glue I used. I got it from
Dollar Tree.
Glue the letters onto the frame. There doesn't have to be a rhyme or reason to it depending on the look you want to achieve. I put the letters in a different position on each frame.
I used scrapbook paper & the die-cutter at
my local craft store to cut out the letters & dots.
Repeat for remaining frames & add any extra embellishments you wish to add. Let dry according to directions on glue.
For the ones in my living room, I glued some black ribbon onto the back of the frame then tied the ribbon into a bow then hung with a nail.

Monday, December 26, 2011

Reverse Applique

I hope you all had a very merry Christmas! I know I enjoyed mine. It was quiet, but sometimes that's a good thing :)

I recently saw this while doing some shopping for Christmas presents. I really like the look of it, but want to replicate that into something I could wear. The last time I checked, I outgrew onesies a long time ago.

The first thing you want to do is find something worth putting onto a shirt. I found this butterfly from Graphics Fairy. Don't worry if you don't like butterflies, she has a TON of stuff you can choose from! You definitely want something simple though. Don't worry about the color or details because all you want is the outline. I copied & pasted it onto a Word document so I could size it to what I needed it to be, printed it, then cut it out of fabric.
Recognize this? It's the same fabric I used to cover my frame!

Place the cut out on the inside of the shirt with the wrong side up.

Sew along the edge of the cut out.

This is what the outside of the shirt will look like after sewing.

Snip a small hole in the shirt within the outline of the shape.

Cut all the way around the outline so the new fabric shows through.

Friday, December 23, 2011

Glass Etching

I promise glass etching is easy! It's even easier if you have a Cricut, Silhouette, or the likes. I don't, so the first few steps will include doing what those machines do for you. If you have them, use them! It makes things much easier & your lines will be cleaner, then skip the first few steps of this tutorial.

Needed:
glass etching cream
paint brush
contact paper (it doesn't matter the color, I went with something that you could see in pictures)
Exact-o
marker
printed letters/name/whatever you want to etch
whatever it is you want to etch the name onto

I decided to put initials onto Pilsner glasses. Lay the letters on the back of the contact paper. Make sure they are backwards!

Trace the letters with a marker and cut them out with the Exact-o knife.

Set the letter aside, you won't need it. Cut an area larger than the letter from the contact paper.

Place it onto the glass.

Brush on a thick layer of glass etching cream.

If you're using glasses like I did, make sure you keep them laying down. The etching cream will run & can get below the contact paper. Then you'll have a weird dot in the middle of the glass that wasn't supposed to be there. My etching cream bottle read to wait 60 seconds before washing it off. I found it works even better if I left it on for 2 minutes.
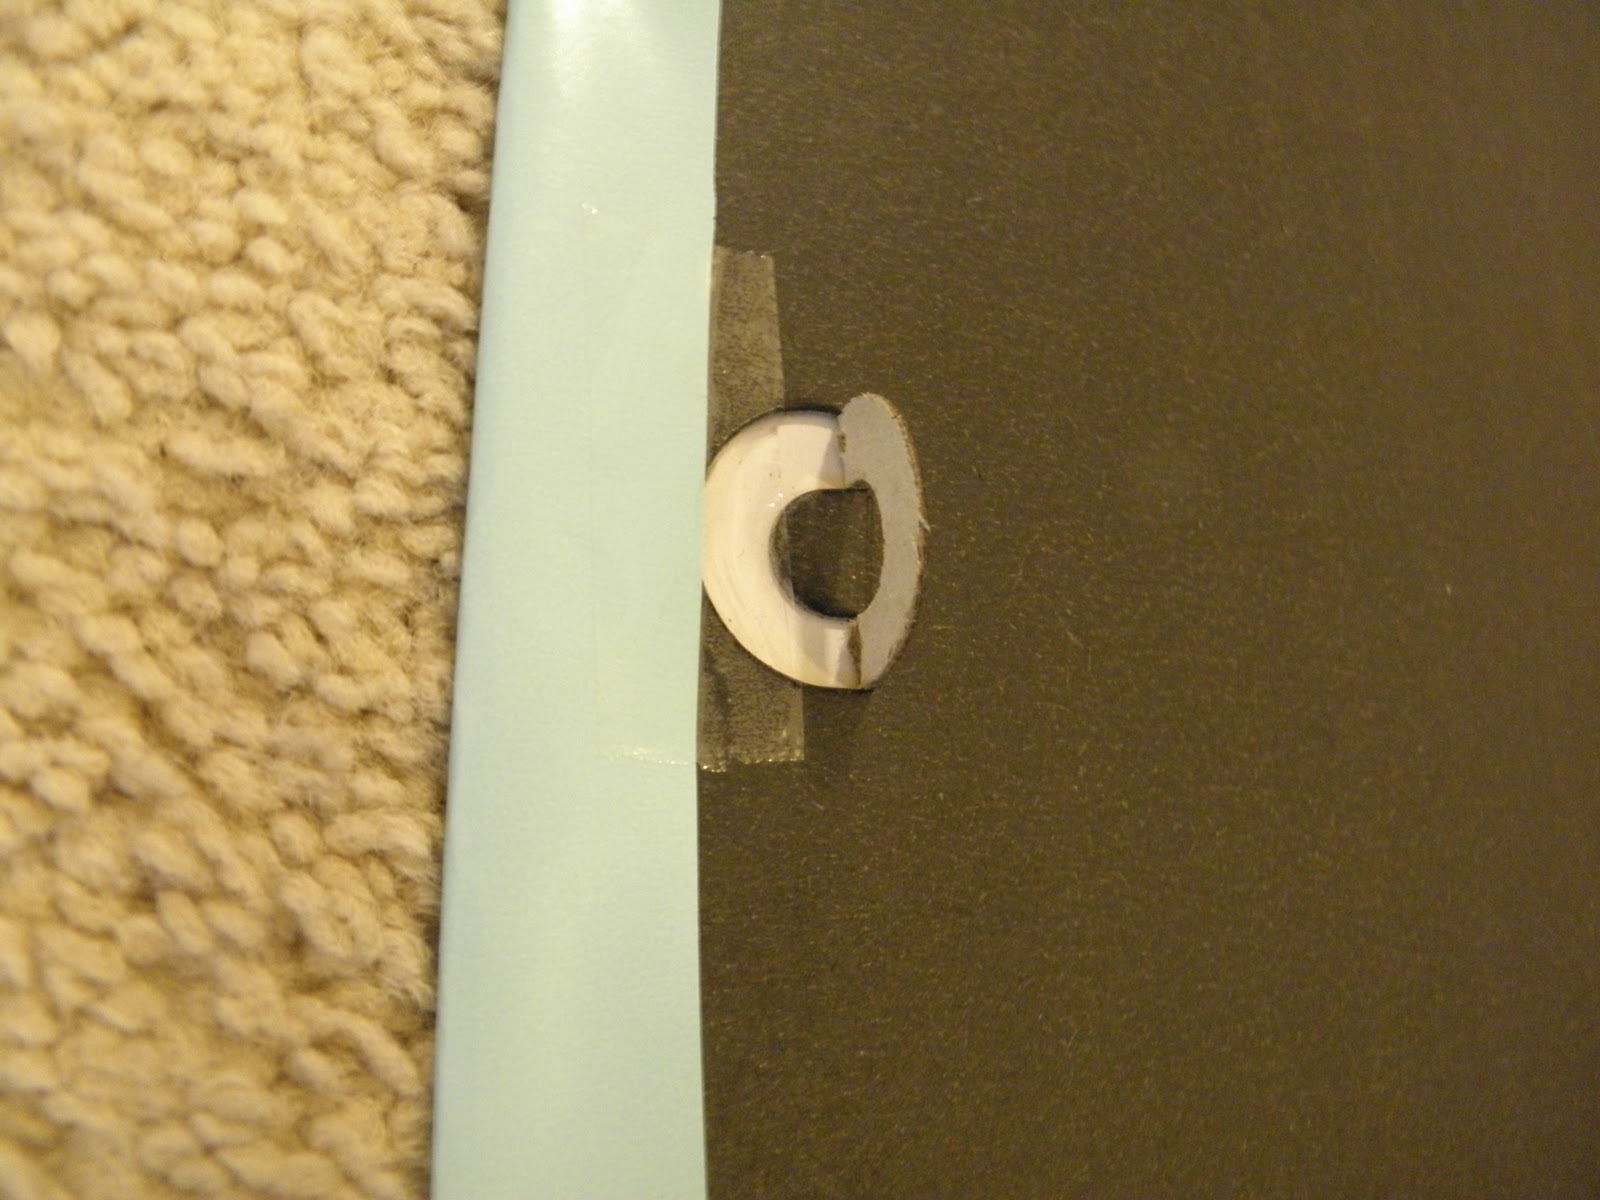
One thing to keep in mind is that if you have letters with negative space within the letter (A, B, D, O, P, Q, R) be sure to cut out the negative space & put that extra piece of contact paper on the glass so that the "hole" will appear on the glass as well.

Wednesday, December 21, 2011

DIY Chalkboard

This craft will come in two parts: the paint, then the chalkboard.
To make the paint, you'll need acrylic craft paint (not the glossy kind), baking soda, and a cup to mix them in.
Mix about 1/4c of paint to about 1tsp baking soda (don't worry about exact measurements, we're not building a bomb or anything). Once it's well mixed, get to painting! You want to do 3-4 coats and let it dry for about 4-5 hours. If you try to use it before the 4 hours are up, you'll take the paint off.

After it's dry, you need to "season" it. You do this by covering it completely in chalk...
...then wiping it off.

To complete the look I wanted, I cut 2 equal lengths of ribbon & attached it to the rectangular tray.

I then glued the other end of the ribbons to the oval tray.

Then, I attached two longer, but still equal lengths of ribbon to the other end of the rectangular tray & tied them in a bow.

Monday, December 19, 2011

Cheater Empanadas

I love empanadas! If you don't know what they are, let me fill you in on their deliciousness. An empanada is a stuffed bread or pastry. They can be filled with meat, cheese, fruit, chocolate, whatever. They are really popular in in Central and South America. I was introduced to them years ago by a friend, but those were completely homemade. Traditional empanadas contain handmade bread, but I try to make things as quick and easy as possible.
This recipe I got years ago and I don't even remember from where! It's super easy, requires few ingredients, and can be whipped up quickly. It's great for a weeknight meal.

Needed:
2 cans of crescent rolls
1lb ground beef
taco seasoning
1c cheese
Preheat oven to 350F. Brown the meat, drain & add taco seasoning as packet directs. Unroll one can of crescent rolls, separate the rolls, and lay them flat on a greased cookie sheet.
Top each roll with taco meat and cheese.
Open and unroll second can of crescent rolls. Top each "loaded" crescent roll with a second and pinch down seams to seal.
Bake 10-15 minutes or until bread is done.
They're great topped with some of your favorite salsa & sour cream!

Friday, December 16, 2011

Cinni Minis

I love cinnamon rolls. Too much probably. When I found these, I knew I had to give them a try. They were delicious, but half the filling ended up on my pan & the icing went everywhere! I knew there had to be a better way. I tweaked it a bit and this is what I came up with.

Ingredients for rolls:
1 can crescent rolls
1Tbsp melted butter
cinnamon
brown sugar
Ingredients for icing:
1 1/2c powdered sugar
2Tbsp maple syrup
2Tbsp milk

Preheat oven to 375F. Open the can of crescent rolls & take out only half of the dough. Separate at vertical lines & pinch diagonal lines together.
If you'd like, you can roll them flat to close the seams more.
Brush each one with melted butter.
Sprinkle with cinnamon (no certain amount, just whatever you feel like!)

Then sprinkle with brown sugar. Again, no certain amount. I want to make this easy for you to remember.
Roll upwards from the short end.
Cut into sections, about an inch or so apart. I usually get about 5 sections per quarter of a can, making 20 cinni minis.
Repeat with remaining dough. Place sections in mini muffin pan and bake 10-12 minutes.
While they're baking, mix powdered sugar, syrup, and milk together.
Once rolls are done:

Top with icing:

This a great recipe to have kids help with and it's also a great alternative to the canned cinnamon rolls. You can control how much sugar & cinnamon are in each! Since there are so set measurements beyond the icing, it's an easy recipe to remember. And since there's not much prep involved (about 5-10 minutes), they're a great quick & easy breakfast. I hope you enjoy them as much as I do!

Wednesday, December 14, 2011

Homemade Hand soap

I love doing homemade Christmas presents! I know I appreciate those more because I think of the time and effort the giver put into making them. I decided this year to make hand soap for my co-workers and friends.

I should warn you that this makes a ton of soap! However, it's cheaper than buying it from the store & will last you a long while. Also, if you're making this for yourself, you should make sure you're in love with the scent.

Needed:
8oz bar soap
gallon of water
2Tbsp liquid glycerin
cheese grater


Once you decide on the scent, grate the entire bar of soap. You can also get 2 bars & only grate half of each so you can create your own scent. Also, no need to use the finest grate possible. Pour water into pot. Add soap & glycerin.Turn heat to med-high and stir until soap dissolves. It should look like soapy water at this point.

Remove from heat and let sit 10-12 hours. Use a beater to mix it all well. Add more water if necessary.


You can pour it into dispensers to give as gifts, keep it for yourself, whatever, If you decide to keep all of it, fill your soap dispenser first, then pour the rest back into the jug the water came in. This same technique can be used to make body wash!
This is what was left after I filled 6 soap dispensers!
Also--if you're wondering where in the world to find liquid glycerin, let me help you out. I searched high and low for this stuff (about a dozen stores), but I will save you that trouble. Go to the pharmacist! I found it at Walgreens, behind the pharmacy counter. Just ask the pharmacist for it & tell him why you need it. The bottle I got was $5. There's bigger bottles for about $25, but why would you need a bigger bottle?!

Monday, December 12, 2011

French Breakfast Muffins

Santa always gets cookies, but I think he would prefer these greeting him after sliding down your chimney. I originally got this recipe from Velvet Lava. I made a slight change to the original recipe. These are super yummy! They are all eaten no matter how often I make them. You're warned: they're addicting!

Needed:
1 1/2c AP flour
1/2c sugar
1 1/2tsp baking powder
1/2tsp salt
1/2tsp cinnamon
1 room-temp egg
1/3c melted butter
1/2c milk

Preheat oven to 350F. Sift together all dry ingredients.
Add wet ingredients.

Mix by hand until combined, but still lumpy. You have to be careful not to overmix! That's why it's important to do this by hand. I did this with a mixer and it wasn't pretty. Don't repeat my mistake!
See how smooth this is? This is NOT what you want!

Scoop batter into a muffin tin that has been well greased or lined. Bake 20-25 minutes or until they're just starting to turn golden brown.
These are my second, better batch.

To make these the most amazing muffins ever, melt 1/3c butter in one bowl. In a separate bowl, mix 1/2c sugar with 1tsp cinnamon.

Dip the warm muffins in the butter then in the cinnamon-sugar mixture.
DIVINE! 

Friday, December 9, 2011

Fabric Covered Frame

Along with all the Christmas cards we get every year, my sister sends us a new picture of her kids. Since we're so far away, we love getting this every year! I want to make a special frame for the one we'll get this year.
While I was at the thrift store picking up a frame to hold my Christmas cards, I grabbed another one that was super cheap. The silver isn't too bad, but the rest of my frames are black. I went to the local craft store and picked up some cheap black and white fabric.

I then cut the fabric into strips (about 2 inches in width).

Using the Mod Podge I made last week, I then decoupaged the fabric to the frame. You want to start and end each strip on the back of the frame.

Start the next strip of fabric where the one before left off.

Try to avoid the corners.
Take the left over fabric and cut it into 1/4in strips.
Apply the smaller strips to the corners using the same technique used on the larger strips of fabric. Wipe a dry paper towel over the entire frame to get any excess glue. Then let it dry (overnight is best).

Until that picture comes, I decided to make it a little festive. I bought some scrapbooking paper from that same craft store & used their die-cutting machine to cut out some snowflakes, ornaments, and bells. I then glued those to white cardstock & put it in the frame to hang for the holidays!

Also, the winner of the scarf that I posted on Monday is Lauralie Lines! She's been notified via facebook. (BTW, my husband thought it was biased since I didn't put him or myself in the drawing)

Wednesday, December 7, 2011

2 for 1!

You get 2 crafts today! Who's awesome? I'm awesome! And of course, all you guys too :) And what's better? They're super easy! You can do both in about 15 minutes!

First up, no-skid socks. All you need is some socks and Puffy Paint.
Just use the Puffy Paint on the bottom of the socks. You can personalize them however you like.


Second is a DIY dry erase board. We have had a dry erase board for a few years, but it got pretty damaged during our last move. I remembered from a previous job that dry erase markers work on glass. I decided instead of buying a new one I'd make one.

You can make your own with a frame, either wrapping paper or scrapbooking paper, tape, and scissors.
First, measure the paper to fit the frame backing (I used an 11x14 frame, so I decided to use some old wrapping paper) and cut the paper a little bigger than what was measured.
Tape paper to frame backing, making sure to avoid the little do-hickey that hangs on the nail.

Tape down corners, it doesn't have to be fancy, it just needs to be down. No one will see it!

Put backing back into frame (behind glass) & hang on wall.
And this is the moment when I realized I should have painted the frame.