I recently became involved with Influenster. They send trendy people (and the not-so-trendy like yours truly ;) ) different products to test and write reviews. As part of the box I received this week I was able to sample ZonePerfect Greek Yogurt bars.
Here's the deal: they're good. I'm not saying that because I got one for free. I really mean they're good. There was no weird diet food after-taste. If you've eaten "diet" food before, you know what I'm talking about.
There's just one problem: corn syrup. I ate about half of it before my husband grabbed it & finished it off. Only then did I read the ingredient list. My fault, I should have read it before I scarfed half of it down. It was worth having to take an allergy pill though :)
I tried the vanilla berry flavor, but since my husband liked it I may have to get him the raspberry flavor for him to eat as a breakfast on the go. There is a chocolate flavor as well, but he tends to like fruity flavored bars.
Thursday, August 29, 2013
Monday, July 22, 2013
Stuffed Peppers
These little guys are divine!

You'll need:
2c cooked rice
1 can Italian diced tomatoes
3Tbsp Worcestershire sauce
4 peppers
1/2c water
salt & pepper to taste
(You could also add 1/2lb cooked ground beef if you'd like)
Stir the rice, tomatoes, salt, pepper, and Worcestershire sauce together in a bowl. Cut the tops off the peppers & remove the seeds. Cram the peppers full of the rice mixture. Set the peppers in your slow cooker and pour water into bottom.
 Set on low for 8 hours.
Yum!

You'll need:
2c cooked rice
1 can Italian diced tomatoes
3Tbsp Worcestershire sauce
4 peppers
1/2c water
salt & pepper to taste
(You could also add 1/2lb cooked ground beef if you'd like)
Stir the rice, tomatoes, salt, pepper, and Worcestershire sauce together in a bowl. Cut the tops off the peppers & remove the seeds. Cram the peppers full of the rice mixture. Set the peppers in your slow cooker and pour water into bottom.

Yum!
Monday, July 15, 2013
Cinnamon Breakfast Bites
I got this recipe from here and it's so good I've made it at least once a month since I discovered it. When my family come to visit, they ask for this every time!
You'll need:
1 can biscuits (I use Grands)
1/4c melted butter
1/2c brown sugar
1tsp cinnamon (I add 1/2tsp more)
1tsp vanilla
1 1/2c powdered sugar
2Tbsp milk
Spray your slow cooker with cooking spray and add the vanilla to your melted butter. In a separate bowl, mix brown sugar and cinnamon. Cut the biscuits into quarters. Roll the biscuits in the butter then in the cinnamon mixture, making sure every inch is covered. Place the biscuits in the slow cooker. Cover the slow cooker with a paper towel then place the lid on top. The paper towel catches the condensation and prevents your rolls from getting soggy. ...Ugh, soggy rolls! Gross!
Cook on low for 2 hours. Mix powdered sugar & milk & pour over rolls when done.

You'll need:
1 can biscuits (I use Grands)
1/4c melted butter
1/2c brown sugar
1tsp cinnamon (I add 1/2tsp more)
1tsp vanilla
1 1/2c powdered sugar
2Tbsp milk
Spray your slow cooker with cooking spray and add the vanilla to your melted butter. In a separate bowl, mix brown sugar and cinnamon. Cut the biscuits into quarters. Roll the biscuits in the butter then in the cinnamon mixture, making sure every inch is covered. Place the biscuits in the slow cooker. Cover the slow cooker with a paper towel then place the lid on top. The paper towel catches the condensation and prevents your rolls from getting soggy. ...Ugh, soggy rolls! Gross!

Cook on low for 2 hours. Mix powdered sugar & milk & pour over rolls when done.

Monday, July 8, 2013
Tex-Mex Calzones
I love spicy foods! I love easy foods! This is a perfect marriage of the two.
You'll need:
1 can pizza dough
1lb ground beef
1 green pepper, sliced
1/2 onion, sliced
1c shredded cheese
taco seasoning
Cook the beef, pepper, and onion. Drain. Add taco seasoning according to package directions.

Unroll pizza crust and cut into fourths. Top one half of each section with the meat and cheese. Fold over and seal edges.

Bake at 350 for 15-20 minutes, or until dough is done.
Monday, July 1, 2013
Hand Trees
I saw an idea a few years back, but I can't remember where I originally saw this posted.
Anyway, I kept this idea in the back of my mind to save for when we have kids. Fast forward a few years and I decided to make this with my sister's kids.
It's really easy. You'll need about a yard or 2 of a solid fabric. Trace the kids hands and arms (to the elbows) on this fabric.
I bought fat quarters in coordinating fabric to cut out leaves and circles. The circles became the clouds. It takes a butt-ton of leaves. If you're not used to this form of measurement, cut out leaves until your hands cramp, stop for the day, start again the next day, and cut out more leaves until your hands cramp again. Then you may have enough.
 Mod Podge it all onto a canvas. I think this one is 17x20.
Remember how I said a while back we redid our guest bathroom...well, this fit in nicely with our gray & yellow color scheme! Super happy dance!

Anyway, I kept this idea in the back of my mind to save for when we have kids. Fast forward a few years and I decided to make this with my sister's kids.
It's really easy. You'll need about a yard or 2 of a solid fabric. Trace the kids hands and arms (to the elbows) on this fabric.
I bought fat quarters in coordinating fabric to cut out leaves and circles. The circles became the clouds. It takes a butt-ton of leaves. If you're not used to this form of measurement, cut out leaves until your hands cramp, stop for the day, start again the next day, and cut out more leaves until your hands cramp again. Then you may have enough.

Remember how I said a while back we redid our guest bathroom...well, this fit in nicely with our gray & yellow color scheme! Super happy dance!

Monday, June 24, 2013
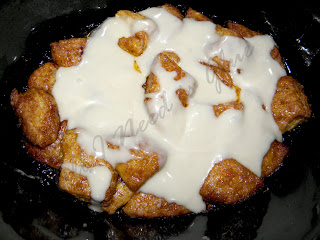
Gooey Butter Cake
I have a really hard time with sweets. Most have some form of corn and I can't have them. I really wanted a delicious birthday cake that I didn't have to worry about having a reaction to later. If the cake mix doesn't have it, the frosting does. It made celebrating my birthday a little bit of a hassle. I wanted an easy recipe that my husband could make without having to take all day or use 100 ingredients.


Paula Deen came to my rescue. But, as fate would have it, my oven stopped working 2 days before my birthday. We were able to find a sugar-free cake that didn't have corn syrup (it did, however, have maltodextrin, but I was just so tired of trying to find a cake I just said, "The heck with it") and I saved this recipe until after my oven was fixed.

I did make changes to Paula Deen's recipe because I don't love butter as much as she does and I wanted to make this a little healthier. (I said a little, don't get too excited.) Also, this recipe uses powdered sugar. If you're watching out for corn, be sure to read the ingredients on the package. Most powdered sugar contains corn starch.
You'll need:
1 box Lemon Supreme cake mix (no corn syrup or maltodextrin)
1 box Lemon Supreme cake mix (no corn syrup or maltodextrin)
3 eggs
1 1/4 sticks of butter, divided
8oz cream cheese, softened
3c powdered sugar
2tsp vanilla
Preheat oven to 350. Mix cake mix with 1 egg and 3/4 stick of melted butter. It will be super thick and have the consistency of cookie dough. Press into a greased 9x13 pan.
Beat cream cheese until smooth. Add 1/2 stick of melted butter and 2 eggs and beat. Add vanilla and sugar, one cup at a time. Pour onto cake.

Bake 40-50 minutes. It will be soft in the middle.

This recipe saved about 800-900 calories by eliminating 3/4 stick of butter & 1 cup of sugar.


This recipe saved about 800-900 calories by eliminating 3/4 stick of butter & 1 cup of sugar.

Monday, June 17, 2013
Sealing Jar
I saw this a while back and thought it would be a good wedding gift for a friend of mine who recently got married. I didn't feel comfortable including the whole letter because, well, it's kind of personal and doesn't apply to us. I think the last time I canned something was about 6 years ago. I'm not a canning kind of girl.
However, I do have some Mason jars. I'm from the South and we drink from 'em! Just kidding. I mean sometimes we do, but that's not why I have them. I was in college when the first "painting jar craze" hit & I still have one from an old college roommate.

It's the blue one.
Anyway, I grabbed one of those bad boys up and thought I would just write the general message of the original post, but the jar was kind of gross.
So I painted it. Then I just wrote on it with a Sharpie.

I found a cute lid (I think it looks better than the brass ones) & tied some raffia around the top.
Cute, simple, cheap, easy. My four favorite things in a home-made gift.
Monday, June 10, 2013
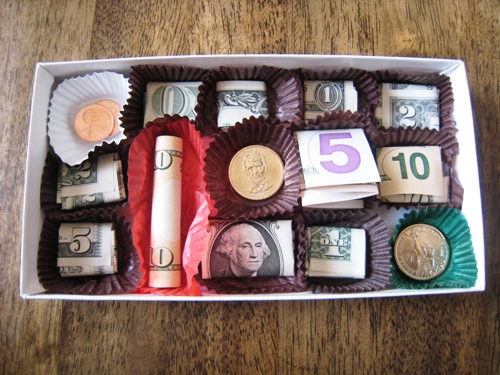
Giving money as a gift
No one complains when you give them cash, but wouldn't it be great to receive it any other way besides in a card?
My cousin recently graduated. We gave him money. Years ago my aunt received a small (about 10 inches) artificial tree with money tied to the branches. What would a teenage boy do with a fake miniature tree?
I went to the local dollar store and bought a lei and some ribbon. I used the ribbon to attach the dollar bills to the lei.

He wore it all night...I think it was a hit!
I looked up some other ideas as well to give you some other options and these are some cute things I found:
Monday, June 3, 2013
Kids Cups
We finally live close enough for my family to visit us regularly. My sister has two adorable kids-a boy and a girl. We don't have kids of our own, but we try to spoil them as much as possible!
One thing that we're not used to (since we're childless) is the constant need for something to drink. I want them to be independent and try to do things for themselves. I decided that having them take care of their own drinks of water would be a step in the right direction.
I found some cups-Avengers for him, Tinkerbell for her. I used hot glue to attach some magnets on the back.

Now they're on the fridge ready for them whenever they want a drink of water!

One thing that we're not used to (since we're childless) is the constant need for something to drink. I want them to be independent and try to do things for themselves. I decided that having them take care of their own drinks of water would be a step in the right direction.
I found some cups-Avengers for him, Tinkerbell for her. I used hot glue to attach some magnets on the back.


Monday, April 22, 2013
Shoebox Art
You all know how I feel about non-decorated walls. I think I've made my point.
However, I love an easy craft & I have a great one for you!
You'll need:
shoebox tops
scrapbook paper, fabric, or wrapping paper
spray adhesive
tape
Spray the tops of the shoebox tops (doesn't that sound weird) with the spray adhesive. Lay it flat & press down to make sure it adheres.

Use tape to secure the paper to the sides of the tops.
 Hang on your wall!
 It'll take all of 15 minutes & look really cute. It's practically free. You can just go to your local shoe store & ask for tops to boxes & they'll give them to you. I found scrapbook paper for $.59 at a local craft store, but you might have some on hand. Fabric and wrapping paper are options as well. Also, you're helping the environment by using your "trash". :)
However, I love an easy craft & I have a great one for you!
You'll need:
shoebox tops
scrapbook paper, fabric, or wrapping paper
spray adhesive
tape
Spray the tops of the shoebox tops (doesn't that sound weird) with the spray adhesive. Lay it flat & press down to make sure it adheres.

Use tape to secure the paper to the sides of the tops.


Monday, April 15, 2013
DIY Febreez
I have a weird phobia: that my house stinks. I've always been worried about people coming over and it smelling weird/strange/dirty/stuffy/gross/what-have-you.
Until a few weeks ago, this fear was mostly unfounded. Then this happened:
 We got a puppy! And you know what that means...puppy piddles. We're working on house training her, but she still has accidents. We've tried several different carpet cleaning tips (the best we found: baking soda & vinegar), but fabrics have a tendency to hold onto smells. I've tried many different tips on making my own Febreez (just to make it cheaper) and this is what I've found works best:
3oz water
3oz white vinegar
2oz conditioner (yep, the stuff to make your hair silky & shiny)
Stir it, don't shake. If you shake, massive amounts of bubbles form & it takes forever for them to go away. It will take a minute, but you want all the conditioner to dissolve. Pour into a spray bottle & go to town!
Until a few weeks ago, this fear was mostly unfounded. Then this happened:

3oz water
3oz white vinegar
2oz conditioner (yep, the stuff to make your hair silky & shiny)
Stir it, don't shake. If you shake, massive amounts of bubbles form & it takes forever for them to go away. It will take a minute, but you want all the conditioner to dissolve. Pour into a spray bottle & go to town!
Monday, April 8, 2013
Paper Towel Roll Art
It seems as though I've become obsessed with reusing rolls from paper towels & toilet paper. I decided to use my latest collection to make a piece of art for our guest bedroom.
You'll need rolls from paper towels and/or toilet paper cut into 1/2 inch sections, paint, and hot glue.
I constructed the piece on my floor first to help with scale and the look of the whole project.
 I kept the whole thing together, just taking out one piece at a time to glue it together. Then I painted the whole thing and hung it up.
 After doing several projects like this, I've learned that it's much easier to paint the tubes before cutting them. Paint the inside & outside of the tubes, let dry, then cut into sections.
You'll need rolls from paper towels and/or toilet paper cut into 1/2 inch sections, paint, and hot glue.
I constructed the piece on my floor first to help with scale and the look of the whole project.


 |
| the stickers are courtesy of my niece ;) she helped me decorate the room until we got a bed to go in it :) |
Monday, April 1, 2013
Candle Holders
I found this idea for candle holders, but I couldn't find colored tape. I mean, I have a hard enough time finding regular transparent tape and now Mar-tha wants me find colored tape. Geez!
Instead, I grabbed some double-sided tape, 2 clear candle holders, some glitter, and (of course) 2 candles.

I wrapped the tape around the edge of the candle holders & rolled it around in glitter.

Boom! Done!
Super easy, and really cheap. The whole deal only cost me $5. Take that Martha & your colored tape!
Monday, March 18, 2013
Easy DIY Curtains
We needed some curtains. Badly. All of our windows were bare because we couldn't either 1) find a curtain to match our stuff or 2) agree on one that kinda/sorta did match our stuff.
I thought it would be easier to find a material we both liked & then I could make the curtains myself.
There are lots of fancy ways to make curtains, but honestly, I just want something to cover my windows. The material I picked for the kitchen was pretty busy so I wanted it to be the focus, not some fancy way the curtain hangs on the window. The ones I did for the living room & bathroom are simple too because of the decor in those rooms.
You'll need:
material
double-folded bias tape
sewing machine
coordinating threads (one to match the fabric, one to match the bias tape)
First, measure the window you'll be covering. You'll need to measure width & length according to what you want the curtains to be when you're done. For example, if you want the curtain to reach to the floor, measure from where the curtain will hang on the rod to the floor. In other words, measure from where the curtain will hang on the rod to where you want the curtain to stop. When you pick out your material use these measurements, but add 5 inches to the length.
You'll also need to figure out the perimeter measurement of your material. For example, in the image above, I will have 2 panels that are 55 inches long and 20 inches wide. 55+55+20(for one panel) x2(for the other panel)=260 inches. This is how much bias tape you will need. Most is sold by the yard so divide by 3 to get how many yards you'll need.
Once you get the material cut, take the bias tape & open it up on just one fold.

Place the material inside the fold &, using a coordinating thread, sew along all but the top edge.
 To get the top of the curtain, you'll need to follow the next 2 steps using the other coordinating thread:

 And my kitchen:

I also made a table runner using the same basic concept:
Happy sewing y'all! If you need any clarification on any steps, just leave a comment!!
I thought it would be easier to find a material we both liked & then I could make the curtains myself.
There are lots of fancy ways to make curtains, but honestly, I just want something to cover my windows. The material I picked for the kitchen was pretty busy so I wanted it to be the focus, not some fancy way the curtain hangs on the window. The ones I did for the living room & bathroom are simple too because of the decor in those rooms.
You'll need:
material
double-folded bias tape
sewing machine
coordinating threads (one to match the fabric, one to match the bias tape)
First, measure the window you'll be covering. You'll need to measure width & length according to what you want the curtains to be when you're done. For example, if you want the curtain to reach to the floor, measure from where the curtain will hang on the rod to the floor. In other words, measure from where the curtain will hang on the rod to where you want the curtain to stop. When you pick out your material use these measurements, but add 5 inches to the length.
 |
| clicking on any image will enlarge it |
Once you get the material cut, take the bias tape & open it up on just one fold.

Place the material inside the fold &, using a coordinating thread, sew along all but the top edge.


I used this technique to make curtains for my guest bathroom (after we changed the decor...more on that later):


I also made a table runner using the same basic concept:
 |
| I'm covering the candles next week! |
Monday, March 11, 2013
How To: Subway Art
Subway art is kind of a big deal, if you didn't know. I think it's a cute, fun idea to showcase favorite quotes, house rules, etc. You could go out and buy something that sort of fits your home or you could do it yourself...let's focus on the DIY aspect of it.
These instructions are for Photoshop, btw. I tried to keep it as simple as possible so I present: Subway Art in 10 steps or less! (It's really 10 steps so you can see how the whole thing came together.)
First, create a new canvas by going to "File", "New", and then creating the actual canvas. I started out with an 8x11 72ppi blank canvas then used the paint bucket tool for the background color.
 Then I used the Text Tool to create each layer. I created a screen shot of each layer I created so you could see the text and font size of each layer. These images can be made larger by clicking on them.

 To create the sideways text, I simply typed in the text box then used the arrows to turn the text box.


 I wouldn't suggest using more than 3-4 different types of fonts. If you use more than that it looks less like subway art & more like a 3rd grade collage.
 I made "stand out" in a different color because I thought it would look appropriate. I mean, it would make the words, ya know, stand out.
 The last step is cropping and flattening the layers. This is the finished project.

These instructions are for Photoshop, btw. I tried to keep it as simple as possible so I present: Subway Art in 10 steps or less! (It's really 10 steps so you can see how the whole thing came together.)
First, create a new canvas by going to "File", "New", and then creating the actual canvas. I started out with an 8x11 72ppi blank canvas then used the paint bucket tool for the background color.


Using different size fonts is key. You want to make it look random without it actually being random. Plan it out in your head & make changes as necessary.


Sunday, March 3, 2013
Penny Pinching: DIY laundry detergent
I decided to try my hand at making my own laundry detergent. First though, I needed to make sure it was going to be worth the effort. I mean, why go through the hassle if I'm only saving a few dollars. So I did the math:
Made detergent:
I would get 271 loads
The cost would be $17
I would end up spending $0.06/load
vs
Bought detergent:
The detergent I buy cleans 30 loads
It costs $5/bottle
That means I spend $.16/load
I'd have to buy 9 bottles of regular detergent to get 271 loads. That means I'd have to spend $45 for the same amount of detergent.
MONEY SAVED: $28
I decided that it was worth it. An extra $28 can give me 1/2 tank of gas! I wish I could make that on my own for cheaper!
You'll need:
4lbs box 20-mule Borax (laundry aisle)
3lb, 7oz box Arm & Hammer Super Washing Soda (laundry aisle)
4lbs baking soda (I found it in the laundry aisle as well, but you may have to venture to the baking area)
2 16oz oxygen cleaner (I got mine from Dollar Tree)
2 7oz bars Zote (laundry aisle, I used pink, but there are others, find the one that suits your needs)
Optional: 28oz bottle fabric softener crystals (I used Purex, but Downey also makes one)
Grate the Zote bars into a 5 gallon bucket. I got mine from Lowe's in the paint aisle.
Add all the other ingredients and mix.
I bought a 2 1/2qt bucket from Lowe's as well so I didn't have to worry about storing it all in my little laundry area and to make it easier to handle.

You'll only need 2Tbsp per load. I kept the scoop out of my oxygen cleaner since it was 2Tbsp (I measured) so I can just tell the hubster 1 scoop per load. Makes it easier.
Monday, February 25, 2013
Problem window
I have waited for an eternity to dress up the window in our living room. Mainly because I lost the hardware for the curtain rod. Sounds lame, I know, but that's what's been the hold up.
I saw something on Martha Stewart that suggested using shelf brackets as a way to hold the curtain rod, but I have a fear of Lowe's and Home Depot so I never went. I finally sucked it up and got all the stuff I needed.


To make the sign, I just painted some wooden letters and super glued them to a white canvas. Super easy.

Monday, February 18, 2013
Knock-off: McDonald's Iced Hot Chocolate
Before I found out I was allergic to corn, I practically lived on McDonald's Iced Hot Chocolate. It was the best stuff to go along with a breakfast burrito. Then they stopped offering it. Completely bummed me out.


Now, it's hotter than Hades around here when it's supposed to be winter! Maybe I'm just used to an Idaho winter and I'll be freezing my bum off like the rest of the folks around here come next year. However, I don't like to drink hot drinks when it's hot. Doesn't make sense to me. I got a hankering for an Iced Hot Chocolate, but wondered if I could figure out how to make it on my own.
News flash: I did.

You'll need:
1 packet hot chocolate mix
1Tbsp chocolate syrup
1c milk
ice
optional: whipped cream
You may have to look around to find a corn-free version of these, but it's really not that hard. If I can find it in a little town in Idaho, I have faith.
Pour everything into a saucepan and cook on low until everything has dissolved and it's slightly warm. You don't need to boil it or anything.

Pour it over ice and stir. I'm not patient enough, but you can top with whipped cream if you like. I'm just
ready to tear into that bad boy!

Subscribe to:
Posts (Atom)