Wednesday, March 28, 2012
Please excuse my absence
I'm dealing with some health issues & finals. Bad combination. Because of all that going on, I decided to take a few weeks to gather myself & then come back with some really awesome crafts. I hope you won't forget about me! I plan on making a spectacular return ;)
General Conference
I am a member of the Church of Jesus Christ of Latter-day Saints. March 31-April 1, 2012 will be the weekend of our general conference. It's where members of the Church get to gather together and hear the President of the Church of Jesus Christ of Latter-day Saints speak. We get to hear apostles, elders, and other leaders of our Church give us guidance. This happens twice a year, once in April and again in October.
I visit 2 sisters each month to give them a lesson or spiritual thought. Since it's right before our next conference I decided to make them a little something to help them prepare for conference as well as provide a little snack while they're watching.


Access Google Docs file here.
If you're interested, you too can watch General Conference either by tuning to BYU-TV or by watching online at www.lds.org.
Monday, March 26, 2012
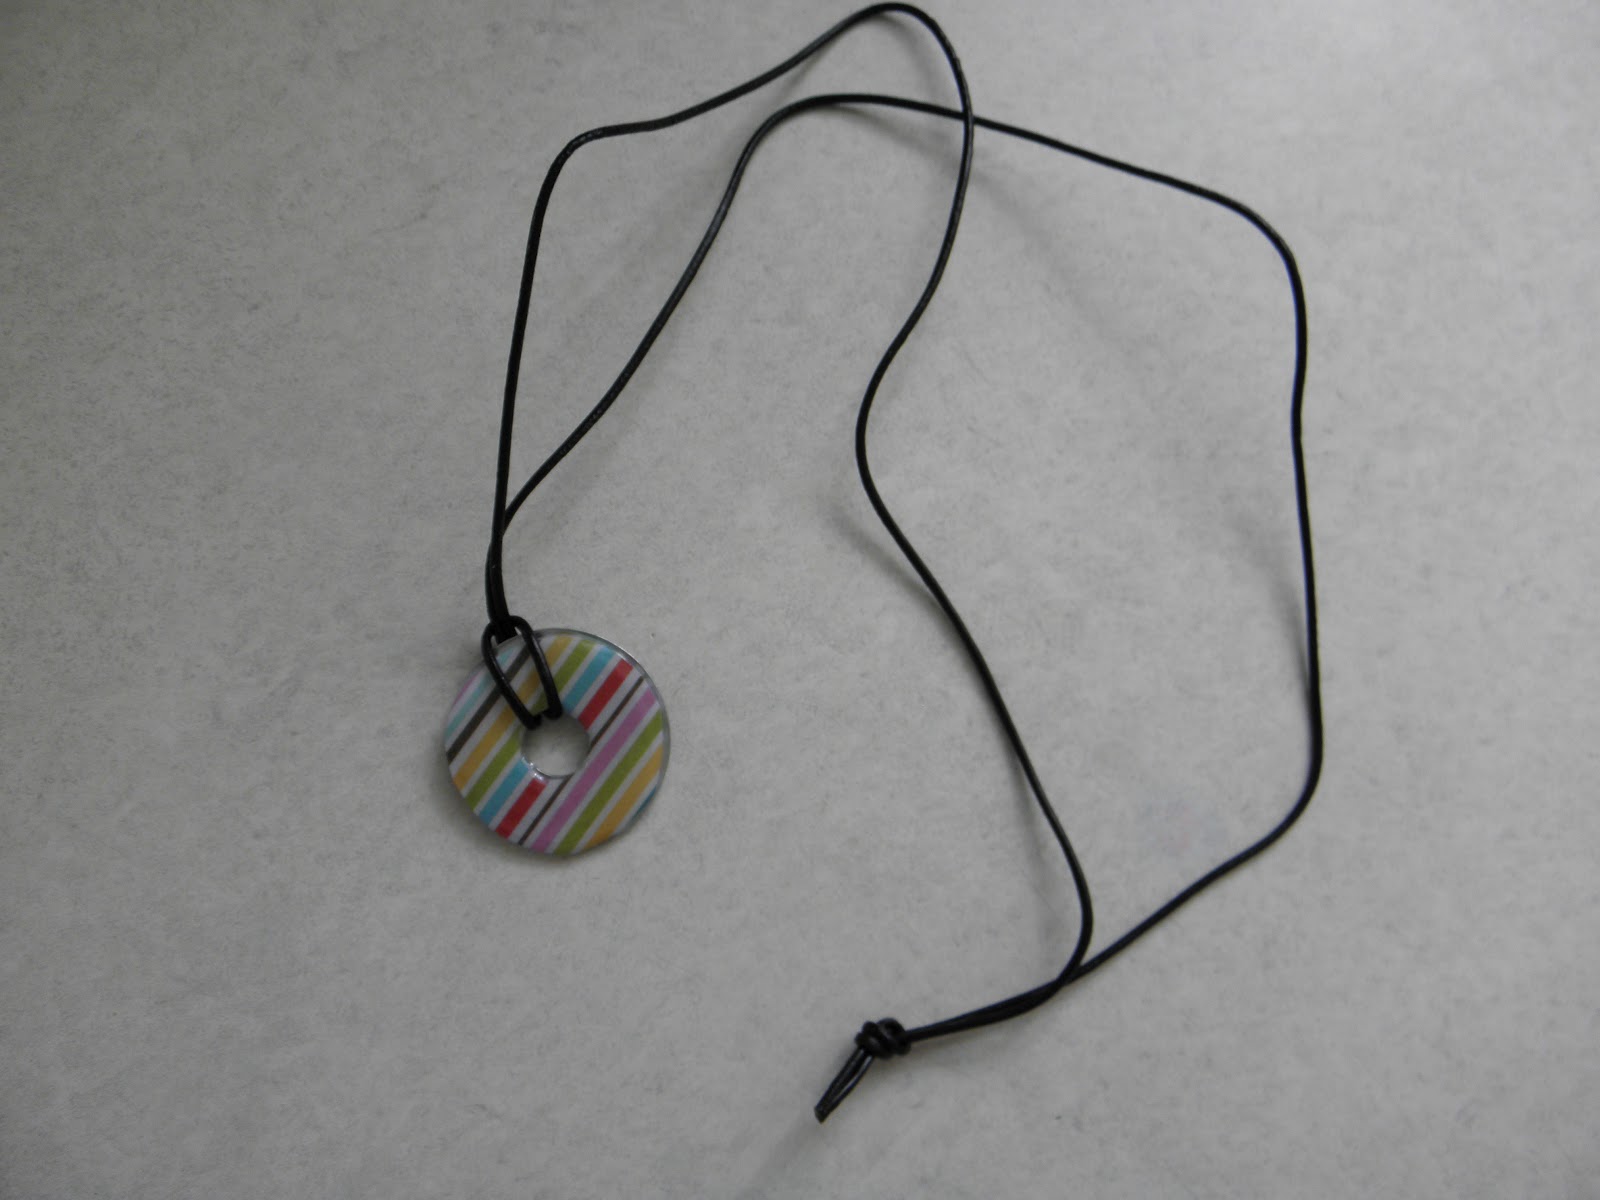
Washer Necklace
I wanted to see if I could make something without spending a dime this week. I used a bunch of left-over materials & borrowed (read: stole) a little something from my hubby to make this necklace:
 You'll need:
a washer
scrapbook paper
leather cording
EnviroTex Lite pour-on (can be found in the craft department)


a washer
scrapbook paper
leather cording
EnviroTex Lite pour-on (can be found in the craft department)

Cut the scrapbook paper to match the size of the washer.

Place the paper on top of the washer. Following the directions on the box, apply EnviroTex pour-on. I used a Styrofoam bowl & a cap to an old bottle of hairspray to contain the excess and elevate the washer.

Once set (my box said to let sit for 24 hours), wrap leather cording around washer to create the necklace. You can use a clasp if you wish, but I decided just to tie a knot in the cording.

Friday, March 23, 2012
Spring Cleaning Week: Odds & Ends
There are some things that people forget about or have never thought to do them. Here are some suggestions that I have. There are many others, so if you know of some leave a comment.
- Check your smoke detector battery. Better yet, go ahead and replace it.
- Flip and rotate your mattresses.
- Wash curtains (if possible).
- Clean your trash can. Sounds weird, but some gross stuff could be lurking.
- Run your washer empty with 1c white vinegar. Helps with any smells and cleans any grime.
- Clean out your car. While you're at it, clean the outside too.
- Delete any old files from your computer.
- Clean out your window sills. There's dirt in there and if you like to have your windows open, it's just going to blow around in your clean home.
- Clean dryer vents. Also, take out the lint collector & clean with a small brush.
- Open the windows and let some fresh air in!
Wednesday, March 21, 2012
Spring Cleaning Week: Keep Your Home Smelling Fresh
I love the smell of a clean home. My husband thinks that's why I clean so much. However, he has lots of allergies that make it impossible to use conventional deodorizers. Aerosol sprays cause him to sneeze and artificial fragrances makes it difficult for him to breathe. I found a couple of things that help with that problem. That's right, you're getting another 2-for-1! How exciting!
First up, a spray.
You'll need:
a spray bottle
2c hot water
1/8 baking soda
1/2c lemon juice
Dissolve the baking soda in the water and add the lemon juice. Pour into the spray bottle.
I don't know if this will affect the color of cloth furniture, so be careful! I try not to spray it near my couches though, just in case.
The second is a refrigerator deodorizer.
You'll need:
an orange
salt
a bowl
Cut orange in half & remove pulp. Pour salt into rind. Place in bowl to prevent a mess in case it gets knocked over & place in fridge. The salt soaks up any nasty odors while the orange helps it smell nice.

Monday, March 19, 2012
Spring Cleaning Week: My List
I have a confession: I'm OCD. About many things. One of the big ones is cleaning. I'm somewhat of a germaphobe. The only time I feel normal is in the spring when the rest of the world decides to pick up my habits. I'm willing to share with you my spring cleaning list! It will take about 2 weeks to complete if you follow this schedule, but it can & should be altered to fit your needs.
Before
starting this, make sure you’re willing to get rid of stuff you no longer need
or use. Don’t let emotional attachments get in the way of having the clean home
you want. If you’d like, take a picture of the object, print the picture, then
write the memory on the back of the picture.

Monday:
Clean out fridge & freezer. Take
everything out. Wipe down all bottles & jars. Throw away anything past its
date. Wipe down shelves, drawers, and doors. Clean out any crumbs in the rubber
seals. Clean the top, front, and sides with Mr. Clean Magic Erasers. Put
everything back in its place. Sweep and mop kitchen floor.
Tuesday: Clean out cabinets. Work one cabinet at a
time. Take everything out and wipe down every item. Throw away anything past
its date. Wipe down shelves, sides of cabinet, and doors. Line shelves if
necessary. Sort cabinet contents by container (can, jar, bottle, bag, etc)
and/or contents (fruits, veggies, beans, etc). Place back in cabinets according
to categories. When working on plates, wipe each one with wet washcloth or
towel to remove any dust. Inspect dishes for cleanliness.
Wednesday:
Clean under cabinets. Take everything out.
Clean all surfaces. Inspect all containers for leaks or faulty packaging. In
bathroom, organize all contents by their use, person using them, frequency of
use, etc. Place back according to categories. In kitchen, organize contents by
their use, frequency of use, etc. Place back according to categories. If
possible, place all cleaning supplies in a large container (bin, bucket, etc)
for easy access in future.
Thursday:
Clean stove, dishwasher, and drains. In
kitchen, pour boiling water down all drains. In bathroom, pour baking soda then
a mixture of vinegar & boiling water down all drains. Wipe down front of
dishwasher. Clean around seal of dishwasher. Run empty with no soap. Wipe down
top of stove & panels where knobs are located. Take out all burners &
drip pans. If possible, lift stove top. Place drip pans in sink filled with hot
soapy water. Clean underneath stove top. Remove oven racks and place in tub or
large sink. Mix baking soda & hot water into a thick paste. Place on all
surfaces of oven and on racks. Let sit 20 minutes. Meanwhile, use rough side of
sponge or a scouring pad to clean drip pans. Allow to dry. Fill spray bottle
with vinegar. Working in small sections, spray vinegar onto surfaces of oven
& racks & wipe clean. If needed, take pumice stone & lightly scrape
burned on foods (be careful not to damage finish). Line bottom of oven with aluminum foil. Replace racks. Cover drip
pans with aluminum foil. Replace drip pans & burners.
Friday:
Dust. Make a mixture of 1 part white vinegar
to 3 parts water. Be sure to wipe down blinds, window sills, baseboards, doors,
and light switches.
Saturday:
Catch up on laundry. Keep machines running.
Iron as needed right away. Put clothes away as soon as done folding. While in
closet, turn all hangers with the open end of hooks facing you. When putting
away clothes after laundry day, turn so closed end is facing you. At the end of
a year, give away any clothes that haven’t been turned around. These are
clothes you do not wear. Place unused dryer sheet in drawers to keep them smelling
fresh.
Sunday: Rest. Enjoy your family. Bask in how much
work you’ve gotten done in 1 week!
Monday:
Clean pantry. Take everything out. Check all
dates. Wipe down all shelves. Line shelves if needed. Sort contents. Place back
contents according to categories. Sweep & mop floor.
Tuesday: Clean living room. Remove all cushions from furniture.
Using attachment, vacuum all cushions and pillows. Vacuum area on furniture
where cushions were, especially deep crevices. Put cushions and pillows back.
Clear all surfaces possible. Wipe down surfaces and all items removed. Put them
all back. If possible, move furniture & vacuum where they sit. Move
furniture back & finish vacuuming.
Wednesday:
Clean bedrooms. Remove sheets & wash. Remove anything from closets that
isn’t clothing. Arrange hanging items by color. Make sure all items in closet
are on hangers. Place toys in bins. Take all items from under beds. Vacuum
under beds, if possible. Dust dressers. Take all items from bedside tables.
Dust each item. Try to keep only necessary items on tables (alarm clock,
glasses, book if you read at night, etc). All items that do not belong in
bedroom return to their respected areas. Enlist the help of children if
possible.
Thursday:
Clean bathroom. Remove all items from
tub/shower. Make mixture of equal parts hot water, white vinegar, and Dawn dish detergent in a spray bottle. Spray this mixture to shower doors, walls, and
tub. Let sit for at least 30 minutes. Rinse well with clear water. Replace shower liner if needed.
Wipe down edge and front of tub. Wipe down each item from shower & place
back. Clean mirror with solution of 1 part white vinegar to 3 parts water. Use
this same solution to clean counters, sink, and front of cabinet doors. Wipe
shower curtain rod with washcloth or towel wet with vinegar/water mixture.
Empty trash can. Wipe down outside of toilet with vinegar/water mixture. Using
gloves and an old sponge, scrub inside of toilet bowl with a paste of baking soda & water. Flush. Wash bath mat. Sweep and mop
floor. Do not let children use vinegar/detergent/water mixture &
use mixture with exhaust fan on. Remove all contents of medicine cabinet. Wipe
down all shelves and doors. Wipe each item. Check for items past their date
& discard. Toss anything that is hard that’s supposed to be soft or soft
that’s supposed to be hard or has changed color. Place the rest of the items
back.
Friday:
Focus of floors. Sweep all bare floors &
mop. Vacuum carpets. For stains, sprinkle area with baking soda, then spray
with mixture of 1 part white vinegar & 1 part hot water. Use towel to apply
pressure & bring up stain. Allow to dry. Vacuum again.
Saturday:
Outside area. Sweep porch, entry way, patio,
and sidewalk. If possible, power-wash concrete surfaces. Sweep any cobwebs down
inside & out with a broom covered with a damp towel. Also use this day to
catch up on laundry. Iron as needed right away. Be sure to place
newly-laundered clothes with closed end of hanger facing you.
Sunday:
Rest. Enjoy your clean home!
Friday, March 16, 2012
Knock-off Week: Rose pillow
Note: I'm having some issues with pictures. Sorry! I was able to salvage one.
I'm not usually a throw pillow kind of girl. You know, the one who has 20 pillows on the bed and another 10 on the couch. I think they're a waste of space and money. However, I do like pretty things and I do like my home to feel welcoming. I also like for my guests to think that I care about my home's appearance. I found this at West Elm while surfing the net one day:
Isn't it precious? However, I flat-out refuse to pay $47 for one pillow. $47! And that's marked down! Heck no! ...So I decided to make it instead.
I'm not usually a throw pillow kind of girl. You know, the one who has 20 pillows on the bed and another 10 on the couch. I think they're a waste of space and money. However, I do like pretty things and I do like my home to feel welcoming. I also like for my guests to think that I care about my home's appearance. I found this at West Elm while surfing the net one day:
 |
| Source |
You'll need:
felt
hot glue & gun
fabric that coordinates with felt
pillow form
sewing machine
coordinating thread
Measure the pillow form & cut out 2 pieces of fabric to cover it.
Remember my St Patrick's Day wreath? Repeat the same process for making the felt rosettes until you get enough to cover one piece of fabric.
Sew the 2 pieces of fabric together on 3 sides.
Slip in the pillow form & sew the remaining side closed.
Glue the rosettes onto the front of the pillow.


Wednesday, March 14, 2012
Knock-off Week: Tiered Platters
I love this from JSG Oceana:
However, we are college students getting ready to move across the country and are, therefore, broke.as.a.joke. No lie. I still want a "fancy" tiered glass service set though for those time when we have friends over & the food just won't fit on our table.

Glue one candlestick holder onto the bottom of 1 plate and another onto the bottom of the bowl according to the directions on the glue.

| Source |
Thank goodness Dollar Tree is just right down the road.
You'll need:
2 plates
1 bowl
2 taper candle holders
strong glue

Glue one candlestick holder onto the bottom of 1 plate and another onto the bottom of the bowl according to the directions on the glue.

I didn't glue all three dishes together for storage purposes, but you can if you like. I just don't have a space where something of this size will fit properly. Besides, not gluing them all together gives me different options in stacking them.
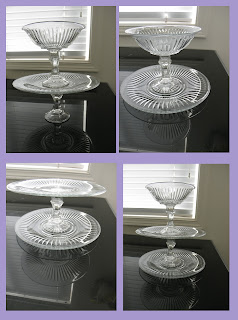 Now, I don't trust the glue to hold up in the dishwasher, but the glue you use may be fine. Also, if one breaks, no big deal! I can just run to the Dollar Tree & replace it!

Monday, March 12, 2012
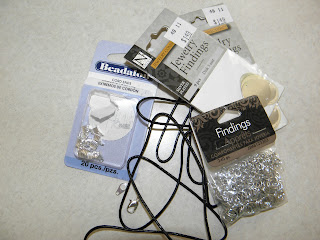
Knock-off Week: Calvin Klein bracelet
I am all about being frugal. I've said many times, "Don't buy what you can make." This week is dedicated to proving that you don't have to buy everything. Sometimes going the cheaper route is best.
I love jewelry! Even using "love" is still a bit of an understatement...ask my husband. I have so many necklaces, earrings, bracelets, rings, etc he complains a bit every time I open my jewelry box. I must admit though, most of my pieces I get at really good prices, but I knew that he would flip out if I paid retail for this beauty:
Yeah, he would have flipped his lid on that one. So...I decided to try my hand at making something similar for about a 1/10th of the cost.

I love jewelry! Even using "love" is still a bit of an understatement...ask my husband. I have so many necklaces, earrings, bracelets, rings, etc he complains a bit every time I open my jewelry box. I must admit though, most of my pieces I get at really good prices, but I knew that he would flip out if I paid retail for this beauty:
 |
| Source. $100!!! |

You'll need:
6-8 inches of black leather cording, depending of desired length
6-8 inches of black leather cording, depending of desired length
jump rings, I used 62
round disks (you can find these near the jump rings), I used 10
1 clasp, I went with a lobster clasp
2 cord ends
2 cord ends

Fasten 1 cord end to one end of the cording. Attach one half of the clasp. This will help the jump rings and disks not slide off while you're working. Slide on jump rings and jump rings with disks attached to them (or loaded) onto the cording. I alternated using the following pattern: 5 empty, 1 loaded, 6 empty, 1 loaded, 5 empty, 1 loaded, 6 empty, 1 loaded.... until I reached 10 loaded jump rings. Then I ended with 5 empty.
 Attach the other cord end and use a jump ring to attach the other half of the clasp.


Friday, March 9, 2012
Cherry Blossom Tree
One of my favorite things about the East Coast is the Cherry Blossoms. They smell wonderful and are a definite signal spring is on its way. Here in the Idaho desert, there are no Cherry Blossoms...unless you count the one in my kitchen.
 You'll need:
1.25 or 2L bottle
black paint
pink paint (you may need white to tone it down)
a canvas or piece of wood


Mix the white & pink paints to get a nice pink color. I mixed 2 parts "hot pink" to 1 part white.

Dip the bottom of the bottom of the bottle into the pink paint.

Press the bottle bottom onto the canvas to create the flowers. I used an eraser tip to create the flower centers. Allow to dry & hang.


1.25 or 2L bottle
black paint
pink paint (you may need white to tone it down)
a canvas or piece of wood

Paint a random "branch" onto the canvas with the black paint. The lines don't have to be perfectly straight. I think it looks better if they aren't.

Mix the white & pink paints to get a nice pink color. I mixed 2 parts "hot pink" to 1 part white.

Dip the bottom of the bottom of the bottle into the pink paint.

Press the bottle bottom onto the canvas to create the flowers. I used an eraser tip to create the flower centers. Allow to dry & hang.

Wednesday, March 7, 2012
St Patrick's Day Wreath
I think before long my new neighbors will realize I have a wreath for every holiday. Yeah, I'm one of those people.
My hubby & I are both of Irish descent. We don't take St Patrick's Day too seriously, but we do take time to honor our Irish heritage.
First stop: a wreath.
You'll need:
plain Styrofoam wreath (or something of similar material)
glue gun
scissors
1/2yd fabric
felt (I used 6 pieces)

Using a template, cut circles of at least 2 sizes out of the felt. The smaller size will help fill in the gap that the larger ones create.

Cut the circles into spirals. If you have fancy-edged scissors use them to create interesting edges on your flowers.

Starting on the outside, roll the felt together. Try to keep the bottom edge as flat and even as possible.

Cut the fabric into 3 inch strips and wrap around wreath.
Use a low-temp glue gun to glue the flower together. Then glue the flower to the wreath.

Keep going until the wreath is covered or the desired look is achieved.

Monday, March 5, 2012
Camera Buddy
I often kid that I have four jobs: housewife, student, shoe salesperson, and photographer. I love all of my jobs (sometimes I love the student job less), but I'm most excited about being a photographer. I get to meet lots of interesting people and capture so many special moments. One of the toughest things about that job though is making sure the kids look at the camera. Most of the time they want to focus on Mom or Dad or some shiny object that just caught their eye. This helps:

I love my little guy! He's really easy to make. Even better, I bought everything I need from the Dollar Tree! I made this little guy for $2!
You'll need a puppet animal, scrunchy of a coordinating color, fabric pen or marker, needle, and thread.
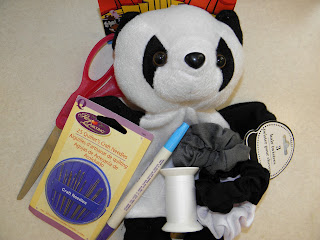
Place the scrunchy on top of the body of the puppet & trace the outer circle with a fabric pen or marker.

Cut out the hole.

Sew the scrunchy into the hole that you just created. Also, sew the bottom closed where your hand would normally go.

Slide the puppet onto the lens of your camera.

Friday, March 2, 2012
Pretzel Treats
I'm gonna do a two-fer. Two treats, one episode ;)
Depending on the one you want to try, you'll need either Rolos & pecan halves or Hershey Hugs to go along with the pretzels. The squares work better than most pretzels. I've tried many kinds and this is best.

Lay the pretzels in a single layer onto a cookie sheet. Top each pretzel with a Rolo or a Hug.

Bake at 350 3-5 minutes. Top Rolos with pecan halves. Top Hugs with another pretzel.
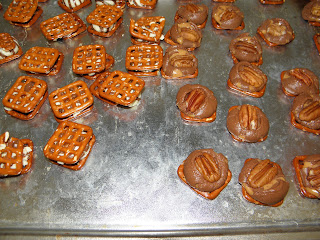
Enjoy those little guys!
Subscribe to:
Posts (Atom)