Search This Blog

Showing posts with label Christmas. Show all posts

Monday, December 31, 2012

CHRISTMAS ON THE CHEAP: Wreath

I know Christmas is over for this year, but keep this in the back of your mind for next year! You can also use other colors for Valentines, Easter, Independence Day, etc.

You'll need:
12 toilet paper roll tubes
hot glue
red & green paints

For half of the tubes paint the inside red & the outside green. Reverse for the other half.
Cut the tubes into strips about 1/2 inch wide & glue 5 together to make a star, keeping the ones that are red on the outside together & the ones that are green on the outside together.
Use one of the colors to be the "big ring" and one to be the "small ring". The small ring uses 5 stars & the big ring uses 7 stars. 
Glue the small ring on top of the big ring. Also, clear nylon thread can be used for reinforcement.
Take a piece of ribbon or sting & hand on your door.


Monday, December 24, 2012

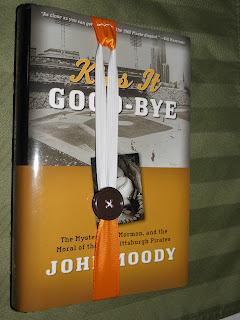
CHRISTMAS ON THE CHEAP: Ribbon Bookmarks

If you have an avid book reader on your list, use this to cross them off your list. I had most of this stuff on hand so I was able to make this for free! I listed a hair elastic in the materials needed, but I used a piece of elastic that I had on hand and sewed it into a circle. I realize not everyone has this, but I wanted to make this as cheap as possible for everyone.

You'll need:
ribbon
hair elastic
button

Measure a length of ribbon using a book as a guide. I just grabbed the nearest book & used it. Place the ends of the ribbon near a lighter or burning candle to seal the edges. Place the hair elastic at one end of the ribbon & fold the end over. Either by hand-stitching or with a machine, sew the end down.

Sew the button onto the end without the hair elastic.

Boom! Done!

Monday, December 17, 2012

CHRISTMAS ON THE CHEAP: Felt Dolls

We haven't been blessed with kids of our own. This means we get to spoil our nieces & nephews! Spoil them rotten then send them home! Merry Christmas to us!

My soon-to-be-four-year-old niece loves dolls. She seriously has a dollhouse at every home she goes to except ours. My mom actually has 2 for her to play with at her place. Our apartment isn't all that small, but it's too small for a dollhouse. I decided to make her something a little special for her to play with when she visits us.

I found this case at a local craft store & painted it pink then glued some gemstones to it. (Like most girls her age she likes things that sparkle.)

I used spray glue to attach some felt to the inside of the top.

Then I cut bodies & clothes out of different colors of felt. I even cut out some hair. I drew the shape I wanted onto one sheet of felt then used it as a template to cut out the other dolls. Then I used the doll shapes to cut out the clothes, ensuring they would fit and the dolls would be modest ;)

I'm very excited about this & I hope she likes it!!

Monday, December 10, 2012

CHRISTMAS ON THE CHEAP: A Couple's Gift

We decided to do home-made gifts to each other this year. This works great if you're friends with a couple or for your parents, spouse, whatever. You can even save this idea to use as a wedding gift.

I found the lyrics to the song we danced to at our wedding: "At Last" by Etta James. I copied the lyrics over and over again to take up a whole Word document.

Then I used the Google to find an outline of a tree I liked, blew it up on my laptop screen, then used my laptop as light box to trace the tree.

I cut the tree out as well as some leaves I printed onto green paper. I glued the tree and the leaves onto black cardstock to make it more sturdy.

I printed a heart on pink paper with our initials in the middle and glued it to the tree.
Then I painted a watercolor "landscape". Super easy! I promise. Run water over paper designed for watercolor paintings. Get it wet. Not dripping, but damp. Wet your paints, then brush the color on. I did one half in brown, then went over it with green, and then painted the other half in blue. Let it dry completely then glue the tree on.

So cute!

Monday, December 3, 2012

LAST MINUTE CHRISTMAS ON THE CHEAP: Twine Letters

I know there are some of you (me included) who wait till the last second or have gifts you need to pick up for people you were thisclose to forgetting about! This month, I'm setting out to help you.

I bought this stuff a while back, before our move, and it's been sitting in my closet for a long time begging to be done.

If you can't find wooden letters, you can just cut it out of really thick cardboard. Same idea.

You'll need:
hot glue
letter
twine
anything you want to stick on it

It really works best if you cut the twine into manageable lengths so you don't have to worry about it getting knotted.

Just hot glue the twine down every now & again to help keep it in place.


I found these flowers at the local craft store. They were part of a garland. I just cut the flowers off of it because I really hated the garland, but loved the flowers. Use some extra twine or a ribbon to hang the letter & you're done!

Friday, December 2, 2011

Felt Star Ornaments

This craft actually comes from my boss! She's pretty crafty herself & an amazing cook. (Okay, so she follows this blog, but all those things are true!) When I told her I was making my ornaments this year, she told me about some that she made. They're so cheap & easy that I had to give it a shot.

Needed (sorry no picture):
Felt
Yarn
Needle
Batting


Start by cutting stars out of felt. You'll want an even number. If you cut a star out of cardboard you can use it as a template and then all of your stars will be a uniform size. I did a Google search & found this that I used as my template.


Use the yarn and needle to sew two stars together, but leave one open side.

Stuff batting into the star. You don't want to make it too full, but you want to give it a 3-D look.

Sew the remaining side closed and use the yarn to create a loop so you can hang your ornament on the tree.

This would also be great as a banner. Just use the yarn to string several of them together. Thanks Kim for the great idea!

Monday, November 28, 2011

Christmas Card Holder

We live in a tiny apartment. Every Christmas (and birthday), we struggle to find space to put our cards that our family sends us. We both come from pretty large families and they're all big on sending cards. Granted, I could buy something to showcase them all, but the ones I found are a little pricey. I decided to make something instead.

I headed to the local thrift store & found some really cheap frames. I grabbed one of the biggest ones I could find.
Sorry for the pictures in this post. My apartment has the worst lighting known to man!
I removed the backing & matting (the glass was already gone) and painted it with black acrylic craft paint. You can skip this step if you're okay with the way the frame looks.

Then I glued white ribbon to the frame. Make sure the glue you use is safe for all the materials you're using and also, make sure you pull the ribbon taut.

It's now hanging in my hallway waiting for all those lovely Christmas cards!
Finally! A decent picture!

Thursday, November 24, 2011

Happy Thanksgiving!

In my family we don't decorate for Christmas until the day after Thanksgiving. However, this year I had to get started a little early because I'm making many of my decorations! I have fallen in love with pinterest & use it as a basis for many of my crafts.

Today I would love to share two recent accomplishments.
The first is my current "window treatment". Most of the time I make curtains to go along with the seasons, but I wanted something different this year. After seeing this, I was inspired! I saw some oversized ornaments at Dollar Tree. They have an assortment of colors, but none in black or white (which is what I chose to do this year). I grabbed some of the silver ones and headed to Wal-Mart. In case you didn't know, Krylon makes a spray paint that is great for plastics. I bought the can of white paint as well as some white ribbon & black ribbon. I painted the ornaments (sorry, no pictures. I'll work on that) and let them dry. I used the ribbon to hang them from my curtain rod. Here's the results:

The next craft is from here. She has loads of great ideas! The only changes I made to her instructions were these: cut the tube in 2 cm intervals, used hot glue (no need to use clothes pins), used acrylic paint instead of spray paint, and no glitter. 
Here's my results (in different stages of doneness):
To get the dots, I dipped a pencil eraser in paint.

I hope you all enjoyed these crafts & I have so many more to come! Have a great Thanksgiving!