Search This Blog

Monday, January 30, 2012

Pepperoni Pizza Puffs

Yep, this is our weather:PM Rain / Snow
Doesn't it make you ill? ...moving on...

I saw this in Everyday with Rachel Ray. Confession time: she annoys me. I don't know what it is about her, but I can't watch her for more than a few minutes before I have to change the channel. I think it's because she's way more bubbly than I'm used to. Most people around me are mellow and she's not. Another thing is her refusal to say "extra virgin olive oil"! Why must she shorten it to EVOO? No one else does!

Anywho, my church has a program where ladies are paired up to go visit each other. We deliver a message and fellowship and try to serve one another. It's called visit teaching. I love it and I love my visiting teachers. They usually bring me a treat, but I decided to make them something instead. In hindsight, I should have doubled this recipe. If you're serving it as an appetizer or as a side, then this is okay, but otherwise, you'll want to double.

Needed:
3/4c flour
3/4tsp baking powder
1Tbsp Italian seasoning
1/4tsp red pepper flakes (I wanted a little kick, you can leave this out)
3/4c milk
1 lightly beaten egg
1c shredded Mozzarella cheese
1/4c grated Parmesan cheese (the stuff in the green can works just fine!)
1c pepperoni slices, cut into quarters
1/2c pizza sauce

Grease a muffin pan. I used a regular sized one, RR used a mini. I didn't want to bring this up, but my mini pan and I called it quits. In a large bowl, whisk together the flour, baking powder, Italian seasoning, and red peper flakes. Then whisk in egg and milk.

Stir in the cheeses and pepperoni. Let stand 10 minutes.

While it's resting, preheat oven to 375. Stir the batter once more and pour into muffin pan.

Bake 20-25 minutes until brown. Meanwhile, heat up the pizza sauce in the microwave until warm.

Dip & eat!

Friday, January 27, 2012

Block Calendar

I have been wanting to make one of these for a while.

I found the kit at a local craft store, but if you can't find one, don't fret. For the blocks, you need two wooden cubes of equal size and three rectangles that are as long as both cubes are together. That means, these can be a big as your imagination! I've seen them where the cubes were 4 inches on each side and the rectangles were 8 inches long!

Once you have your blocks, you'll also need scrapbook paper, paint, and some way to put the numbers and months onto the blocks.

Start by painting all the wooden pieces. I even painted the little housing unit for my calendar pieces (it came with the kit).

Trace the cube onto the scrapbook paper to get 12 squares and cut them out.

Using mod podge, decoupage the paper onto the cubes. Place the numbers on top. (I put on a glaze coat to make it shiny, but this isn't necessary.) On one block, put the numbers 0, 1, 2, 3, 4, 5 and on the other put 0, 1, 2, 6, 7, 8 (the 6 can be used as the 9 as well, so make sure it's not on directional paper).

I decided to stamp the months onto the rectangles because I had a hard time finding stickers I liked in the size I needed. I found the stamps and ink in the dollar bins in the craft section of Wal-Mart. If you decide to stamp, do this directly onto the wood. I tried to stamp paper then decoupage it onto the rectangles, but the ink smeared.

Place the blocks into the holder (if you have one) and set out to display!

Wednesday, January 25, 2012

Homemade Creamer for Your Steamer!

I used to drink coffee by the gallon! However, I gave it up 8 years ago when I joined the Church of Jesus Christ of Latter-day Saints. It's all part of the word of wisdom you can find here. That doesn't mean I don't love an occasional hot drink though! I love hot chocolate, herbal teas, and steamers. There's also Pero, which has the taste of coffee, but it's made with other stuff and is caffeine-free for all you caffeine abstainers (not me, caffeine is one of the things that makes this machine run). I found a recipe from a fellow blogger for homemade creamer, but I've since lost the website (sorry to whoever this recipe belongs to!).

Needed:
1 can sweetened condensed milk
1 1/2c milk
1tsp vanilla
Mix all of the ingredients in a container with a lid & shake. You'll need to keep it in the fridge. I used an old creamer container to keep it in.


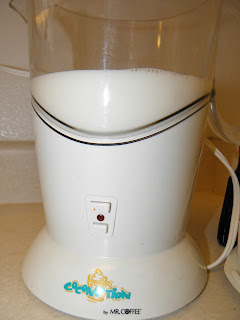
To make a steamer, all you need is a cup of milk and a little less than 1/4c of creamer. If you have one of these handy devices, use it!
If not, put the milk in a pot & whisk until frothy & warmed through. Mix in the creamer. Really yummy & easy peasy!

Monday, January 23, 2012

Bean Dip

I have a confession: I hate re-fried beans. I also hate guacamole. However, this recipe has both and I can't get enough of it!
This is actually the third post that comes from my boss. I told you guys she's talented! She's made this dip a few times since I started working for her and I finally wrangled the recipe from her.

You'll need:
1 can re-fried beans
8oz cream cheese
8oz sour cream
avocado
garlic powder
1tsp mayo or Miracle Whip (which I prefer)
1c shredded cheese
juice of half a lime (not pictured)

You need to start by making the guacamole. If you have a favorite recipe, then go for it. However, I said before I really hate the guac. My boss told me she makes hers by mashing an avocado, mixing in some garlic powder (to taste), the juice of half a lime, and a teaspoon of mayo. You cannot use the pre-made stuff though! The taste isn't the same.

Spread cream cheese in the bottom of a 8x11 pan. Top with beans then sour cream. Pour on the guacamole then top with cheese.


Cover with foil & bake at 375 for 30 minutes.

Eat up that bad boy!

Now my boss adds olives before she adds the cheese...which leads me to another confession: I hate olives. You could also add tomatoes & onion if you'd like.

Friday, January 20, 2012

Nursing Cover

My friend that recently had a baby decided to breast feed. It's almost time for her to start venturing back into the real world (church, school, etc) and doesn't like carrying around a huge blanket to fight with while she nurses. I decided to make her a Hooter Hider! --a nursing cover. It's actually much simpler than I expected.
I got help from Sew Much Ado, but changed some of her directions. My friend is about my height (read: short) and the directions she had would have been way too...everything. Keep in mind I'm 5'3 and this left plenty of length. Mine also isn't as wide as hers. It kind of felt like a backwards cape when it was wide. If you want it wider, make it that way by all means.

You'll need about a yard of material. I used regular cotton fabric although she recommended home decor fabric. The cotton worked just fine. Also grab 2 D-rings, 18 inches of boning with fabric casing, and some matching thread. I was able to find boning at a local craft store. You'll probably have to ask for it. Not many people use it so sometimes it's hidden.
 Cut the fabric into 3 pieces: 4.5"x30", 4.5"x10", and 30"x30".
Sew the two 4.5" wide pieces with right sides facing each other. The 10" should look like a tube. The 30" piece should be open on one end. On the other end, curve it slightly so that it comes to a point. These will become the neck pieces.
Trim off the extra fabric from around the curved end.
Turn the neck pieces right side out. Press flat and sew a 1/4" seam on both sides of each piece. (This is just help it look nice as well as make it easier to attach & use the D-rings.)
If anyone has any tips on how to turn the pieces right side out,
please share them! I struggle every time!
Take the 10" tube and match raw edges together. Put D-rings near fold & sew to encase.

Press a 1/2" seam at the top of the 30x30 piece (we'll call this "the body" of the piece). If you're using patterned fabric make sure you know where the top is. If you're like me and don't normally press when sewing, don't be tempted to skip this step as well as the next one. They will come in handy later!
Fold another 1/2" and press again.
Open the last fold & place the boning in the center. You should have about 5 inches of extra fabric on either side. Make sure the boning is positioned so that it's curving towards you. Pin that bad boy in place.
 On the casing for the boning, there will be a little extra fabric on one side, sew along this edge.
I just positioned it so that the foot was resting right on the
boning. At times it slipped off, but I just re-positioned.
It may take some patience, but you'll be fine.
Place the raw edges of the neck pieces at either end of the boning. Let the edge fold at the second pressing, pin, then sew along bottom edge of crease. This will make the boning curve away from you.
Flip the neck pieces so they are going away from the body & sew them into position. 
Do this for both neck pieces.
Press a 1/2" seam on the other 3 sides of the body, then press a second 1/2" seam. Sew all around the body to finish.

If you're unsure of the use of D-rings, it's pretty easy. Take the long neck piece and put through both rings. Then pull it back out again through only one.


Wednesday, January 18, 2012

Slow Cooker Braised Beef

I got this recipe from the kitchn & they called it "Mexican Braised Beef". The thing is, I don't know how "Mexican" this thing really is. I do, however, know how yummy it is! I did change a few things though, so if you want the original, you'll want to check out that link.
This is theirs.

You'll need 2 Poblano peppers, a roast that's somewhere between 1.5 & 2 lbs, a can of diced tomatoes (drained), a can of Mexican stewed tomatoes (not drained), a sliced onion, and a little bit of oil. Sorry I didn't snap a picture for you.

You'll want to roast the peppers. Just turn your oven to broil and place the peppers. Keep an eye on them & turn as it browns. You want them to look like this all the way around.
Wrap them in foil & put them in time out for a few minutes.
While they're thinking about what they did wrong, cut the roast into chunks. Remove as much fat as you can and place in pan with oil.
Sear for a couple of minutes on each side. We're not trying to cook it, we just want it brown. While that's going, unwrap the peppers and peel the skin off.
Remove the stem & the seeds then dice.
Once the meat is done, place it on a plate, but don't clean the pan. Toss in the onion & brown.
Add the peppers.
Toss around a bit then add the tomatoes.
Simmer the sauce for a few minutes then pour into your slow cooker. Put the beef on top & let cook on low for 7 hours.
Once done, shred the meat using a couple of forks. I served ours on top of rice. I made it a little special by adding some cilantro & the juice of one lime to the water I cooked the rice in.
What I found was that it was tasty as is, but it really was over-the-top with a tad of sour cream & a little salt.